
Data Availability
The data availability scheme was updated in December 2021. Data on spectrometers are automatically copied to the lab datastations (nmr15/50 in Searle and nmr8/60 in GCIS). Use a graphical file transfer utility to copy spectra from those locations to your laptop. You may also process data with Topspin or MNova Chemist at the datastations.
PRELIMINARY NOTES:
- You are not allowed to plug USB drives into any of the facility computers. You must use the network.
- Data on spectrometers is automatically copied to datastation computers approximately every five minutes.
- Data are most easily copied from the datastations using free graphical file transfer programs like Filezilla and Cyberduck.
- Older methods of data retrieval using the linux command line still work, but are more labor-intensive and are no longer described here.
Key elements:
Required Software
To copy data from the NMR facility to your laptop, you will need a file transfer utility program.
 Recommended Software #1: Cyberduck
Available for free for Mac and Windows here: https://cyberduck.io/
Available for the Mac in the App store. The price is listed at $24.99, but you may be able download and use it for free from here anyway.
If you do not pay for Cyberduck, the program will ask you to donate to their effort every time you close it. You can click “later” an infinite number of times, though.
Cyberduck nicely integrates into one’s desktop environment, making remote folders appear in a window resembling local folders. Copying items is achieved by simply dragging from one place to another.
 Recommended Software #2: Filezilla.
Available for “all platforms” here: https://filezilla-project.org/ .
Available for the Mac in the App store – no apparent cost.
Filezilla provides an interface divied into two distinct file structures, one for remote systems, and one for local. Copying items is achieved by first identifying both source and destination folders, and copying items from one to the other.
Quick orientation to the datastations
Datastations are access points.
Each lab (Searle/GCIS) has one datastation visible by the world outside the lab. Each datastation collects data from the spectrometers within its lab, but cannot directly access instruments in the other lab. If you acquired data in Searle (on 400-1, 500-1, or 500-2), your spectra are on the Searle datastation nmr15/50. If you acquired data in GCIS (on 400-2 or 500-3), your spectra are on the GCIS datastation nmr8/60.
Datastation names, dual nature
In this documentation, the two datastations are called “nmr15/50” (Searle) and “nmr8/60” (GCIS). From outside the NMR lab local area network (LAN), like your home or main laboratory, you will need to access them as “nmr50” (Searle) and “nmr60” (GCIS). When inside the physical lab space, you may notice that their command prompts read “nmr15” (Searle) and “nmr8” (GCIS). For practical purposes, nmr15 and nmr50 are the same computer, as are nmr8 and nmr60.
Data processing on datastations – upgraded MNova
You are welcome to process data in each lab using its datastation, which is equipped with both Topspin and MNova. See below.
Ensure Connection to the Campus Network
Access to the data servers requires recognition that your computer is part of the UChicago network. You must either be connected to the campus eduroam WiFi with UChicago credentials or have activated the UChicago VPN.
NOTE TO VISITORS: If you’re visiting from another campus that uses the WiFi named “eduroam”, you’ll need to *forget* the eduroam WiFi, then join again using UChicago credentials. We’ve had issues where people get automatically connected to edroam using their other institution’s credentials, but they can’t connect to license or data servers. Though non-UChicago credentials on eduroam provide general wifi access, they do NOT confer UChicago community privileges, like access to license servers or other restricted resources.
Connecting to datastations with Cyberduck
- On your laptop, open Cyberduck.
- Either click File…Open Connection in the main menu, or click Open Connection in the Cyberduck browser window. You should see an interface that looks like this:
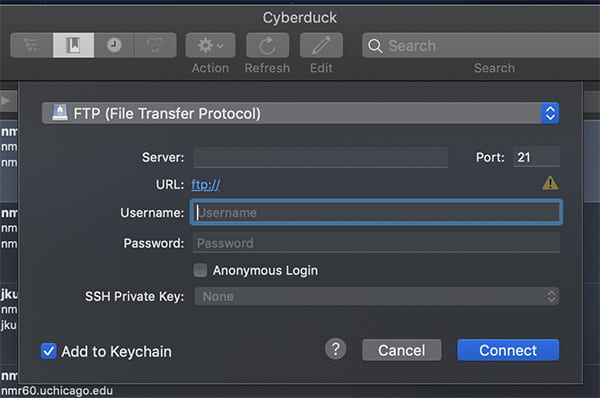
Cyberduck connection window – blank
- Fill in the connection interface:
- Pull down the method menu so it reads “SFTP” for the connection protocol.
- In the “Server:” field…
- For Searle data, type: nmr50.uchicago.edu
- For GCIS data, type: nmr60.uchicago.edu
- Make sure the “Port:” field reads “22“
- Type your username and NMR facility password
- You can leave “SSH Private Key” set to “None“.
- It’s recommended you check the “Add to keychain” if you’re using your own personal laptop so you don’t have to type this information every time you want access.
- It should look basically like this:
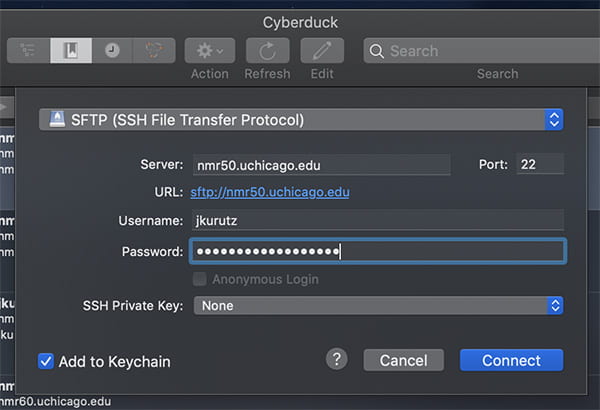
Cyberduck connection window – filled
- Click “Connect“, and you should see the contents of your Home folder. Click “nmrdata” to see your data.
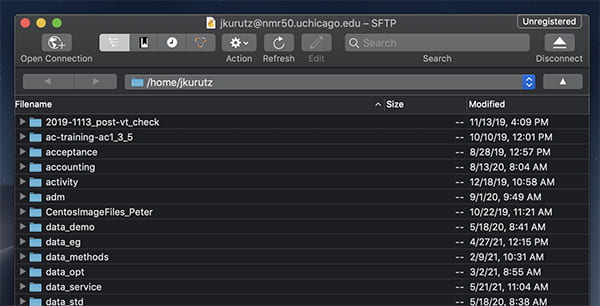
Cyberduck remote file browser
- Feel free to add a bookmark so you don’t have to type this information again.
Connecting to datastations with Filezilla
- On your laptop, open Filezilla. It should look something like this:
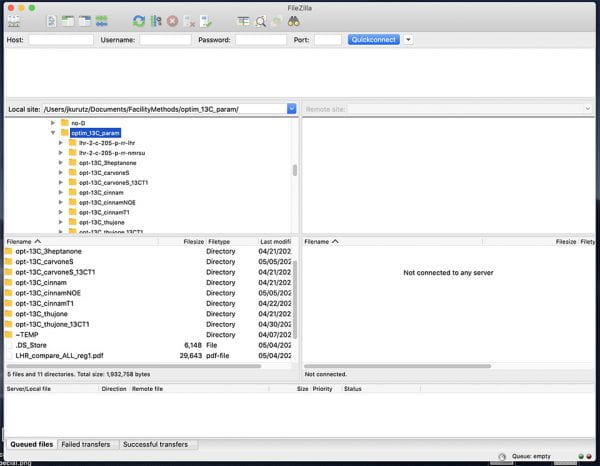
FileZilla connection window – blank
- On the top line with open fields, fill them in…
- For Host…
- For Searle data, type: nmr50.uchicago.edu
- For GCIS data, type: nmr60.uchicago.edu
- For Username and Password, use your NMR facility credentials
- For “Port:“, type “22“
- It should look something like this:

FileZilla connection window – filled
- For Host…
- Click “Quickconnect“, and you should see the contents of your home folder in the right-hand portion of the browser.
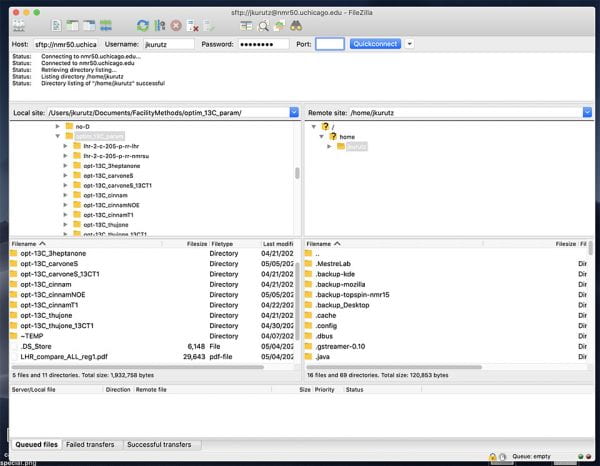
FileZilla connection window – connected
- Feel free to add a bookmark so you don’t have to type this information again.
Processing data at the datastations
There are three main reasons why one may want to process data at one of the datastations:
- Immediate analysis of data acquired on an automated instrument.
- Access to MNova’s Verify module, which is not included in the site license, and/or access to the latest version of MNova.
- Avoiding installation of processing software on one’s own computer.
Immediacy
The automated instruments are terrible places to analyze data. Permissions conflicts prohibit phase correction, peak picking, and integrating. One may also be tempted to close the software after investigating a spectrum, leading to troublesome shutdown of data acquisition affecting other users.
Since December 2021, all new data are automatically copied from the spectrometers to the local datastations approximately every five minutes. Thus, if one logs in to a datastation to process new data, the longest wait one would experience is five minutes after data collection. If you have submitted a sample for acquisition and there was no sample ahead of it, you may wish to wait at the datastation and fully analyze your spectrum as soon as it is available.
 MNova Verify
The Basic version of MNova provided with the site license includes sophisticated spectrum assignment tools. The MNova Verify module enables you to get a score evaluating the quality of your assignment, which will alert to you significant errors you may have made.
To use this tool:
- Locate and review the MNova Verify Start Guide: https://resources.mestrelab.com/starting-guide-to-mnova-verify/
- Consider watching the MNova webinar on structure verification: https://resources.mestrelab.com/towards-automating-small-molecule-structure-verification/
- Consider reading the MNova Automated Structure Verification workflow: https://doi.org/10.1177/2472555220907091
- Check out the short page highlighting how to leverage Predict and Verify tools for making assignments: https://resources.mestrelab.com/assisted-assignments-predictions/
- Identify the .mnova file for your molecule that includes its structure and assignments.
- Use Cyberduck or Filezilla to copy your .mnova file to one of the datastations nmr15/50 or nmr8/60.
- Inside the corresponding NMR lab, log in to the physical datastation
- Start MNova and open your .mnova file. User the Verify tool to get your score. (Instructions provided by Mestrelab.)
Command Line Method
If your data are not available on the datastation for some reason (e.g., only a few minutes old or EPR data that isn’t on the regular automatic backup), you can use command line techniques to copy your data from a spectrometer to your folder on the datastation. Once it is on the datastation, you can copy it to your laptop with Filezilla or Cyberduck, as described above.
On your laptop…
First, open up a command line window on your laptop. On a Mac, the usual application is named “Terminal”, and on a Windows system, it is named “CommandPrompt”.
Check whether you are on the UChicago network. If you’re on campus wifi, you’re on the network. If you’re at home or elsewhere, you’ll need to activate the UChicago VPN to gain campus privileges.
Second, connect to the appropriate datastation with the command “ssh”. For the Searle NMR labs and Jones EPR lab, the correct datatation is named “nmr50”, and for the GCIS NMR lab, it is “nmr60”. Type the following, substituting your NMR username for <username>:
ssh <username>@nmr50 (or ssh <username>@nmr60)
The remote system will then ask you for your NMR password. Provide it. The first time you connect, you may see a long warning message informing you that you’re connecting to a new computer, and you may be asked whether you wish to accept the risk of connecting. Answer “yes” (or “y”).
Once logged in to a datastation…
When logged in, you should see some text on the command line that looks like this:
[<username>@nmr15 ~]$ (or, in GCIS: [<username>@nmr8 ~]$ )
This is called the “prompt”.
At the prompt, you may type the names of some custom scripts that have been set up for you to copy your data to your nmrdata (or eprdata) folder. Their functions are pretty self-explanatory:
get400-1 copies your data from 400-1 to your nmrdata folder on the datastation nmr15/50
get500-1 copies your data from 500-1 to your nmrdata folder on the datastation nmr15/50
get500-2 copies your data from 500-2 to your nmrdata folder on the datastation nmr15/50
get400-2 copies your data from 400-2 to your nmrdata folder on the datastation nmr8/60
get500-3 copies your data from 500-3 to your nmrdata folder on the datastation nmr8/60
getepr copies your data from the epr computer to your eprdata folder on the datastation nmr15/50
The first time you connect to an instrument this way, you may see a message asking if you are sure you wish to connect. Answer “yes”.
You will be asked to provide your NMR password. Provide it. You should then see a scrolling display of all the new files from the instrument as they are copied to your datastation folder.
Done!
Once your files are all copied, you may exit the system and continue with Filezilla, Cyberduck, or equivalent program to copy the data from the datastation to your laptop. Type “exit“.
Optional exploration
If you’d like to explore your folders further using the command line, please check out these useful command line commands and simple instructions on how to use them: https://www.hostinger.com/tutorials/linux-commands. You can learn quite a lot about your files and develop a sense of skilled independence by learning how to use commans like “pwd”, “ls”, “ls -l”, “grep”, etc.