
MNova software from Mestrelab
The University of Chicago owns a campus license for the popular NMR data processing and analysis software MNova, including modules for NMR spectrum prediction, quantitative NMR (qNMR) analysis, and reaction monitoring (kinetics), as well as mass spectra and UV/Vis/IR data. Campus users, including graduate and undergraduate students, postdocs, and other researchers, are encouraged to install MNova on their own computers.
6 Steps to Make MNova Happen on Your Computer
1. If you haven’t done so already, download, install and configure the UChicago VPN (virtual private network)
2. Download the MNova installer from Mestrelab
3. Install the MNova software (Mac / Windows)
4. Configure access to the UChicago MNova License Server
5. Start the software and activate the advanced plugins (qNMR and Reaction Monitoring)
Step-by-Step Instructions
1. Make sure your computer is on the UChicago network, VPN
- If you’re on campus, connected to the net via university WiFi, you should be OK to proceed. But you should take the opportunity to make sure you’re installed the UChicago VPN for when you’re off campus.
- SPECIAL FOR VISITORS: If you’re visiting from another campus that uses the WiFi named “eduroam”, you’ll need to *forget* the eduroam WiFi, then join again using UChicago credentials. We’ve had issues where people get automatically connected to edroam using their other institution’s credentials, but they can’t connect to license or data servers. Though non-UChicago credentials on eduroam provide general wifi access, they do NOT confer UChicago community privileges, like access to license servers or other restricted resources.
- If you’re off campus or otherwise not connected directly to a UChicago network, connect to the UChicago VPN.
- To download and install the Cisco AnyConnect VPN software, start by navigating to the UChicago VPN website: https://cvpn.uchicago.edu/ . This site requires CNetID login and two-factor authentication.
- When done, you should be connected to the UChicago VPN.
2. Download the latest installer from Mestrelab
- Navigate to https://mestrelab.com/main-product/mnova

- Click the icon appropriate for your computer (PC/Mac/Linux)
- The download should begin right away
The next steps depend on the platform of your computer:
PC, Mac, or Linux
Mac Installation & Licensing
PC Installation & Licensing
Mac instructions
3. Install MNova on your computer
- If you are running another version of MNova, quit it and and get ready to uninstall it.
- Double-click on the installer file “MestReNova-<version number>.dmg” and agree to the lengthy terms and conditions. A window should open up showing an MNova icon, a big arrow to its right, and folder labeled Applications.

- Drag the MNova icon onto the Application folder to start installation.
- If you encounter problems, please see the detailed instructions provided by Mestrelab here:
https://resources.mestrelab.com/how-to-install-mnova/. - Click “OK” if you are asked to uninstall an existing version of MNova.
- In the final installation window, click “Finish”.
- DO NOT RUN MNova yet.
4 – Configure connection to the UChicago license server
- In the main Finder menu, click Go > Connect to Server

- In the Server field, enter “smb://licman.psd.uchicago.edu/Mestrelab” and click the Connect button

- You should get a prompt asking for credentials. Connect as a “Registered User” and use:
usern ame = LICMAN\mestrelab
pas sword = chemNMRlab340F - DEFINITELY check the “remember this passw ord” button.

- Click the Connect button.
Check in any Finder window, under Locations, that there is an entry named “licman.psd.uchicago.edu“
- Set up your computer so it mounts the server automatically
- Navigate to Apple Menu > System Settings > General > Login Items

- In the Login Items & extensions window, click the “+” button

- Navigate to find “licman.psd.uchicago.edu” in the window provided

- Click the Mestrelab item, then click the Open button.
- The Mestrelab license server should appear in the Login Items & Extensions menu, indicating your system will connect to the server at every boot.

- ALSO: Open a Terminal window (found in Applications > Utilities > Terminal)
- On the Terminal command line, type or copy/paste:
defaults write com.mestrelab.MestReNova License.SharedRepository /Volumes/Mestrelab
- Navigate to Apple Menu > System Settings > General > Login Items
- HELPFUL: If you get disconnected from the license server, you can easily run a quick connection script named “Mestrelab Licenses.inetloc”.
- Navigate to https://uchicago.app.box.com/v/MestrelabLicenses
- Identify the file “Mestrelab Licenses.inetloc”, then click on the “…” at the right and select Download.
- Place this file somewhere convenient, like your desktop or Documents folder.
- If you ever get disconnected from the license server and need to reconnect, simply click this file, and a preconfigured reconnection process will start.
You should now be able to run MNova without further action. However it is highly recommended to take this opportunity to activate the advanced modules qNMR and Reaction monitoring now.
•
PC/Windows Instructions
3. Install MNova on your computer (PC/Windows)
- If you are running another version of MNova, quit it and and get ready to uninstall it.
- Double-click the downloaded file to start the Installation Wizard. Proceed with default selections, making sure you have selected the modules NMR, NMR Predict Desktop, Mestrelab Predictor, MCChrom, ElViS, Mnova qnmr, and Reaction Monitoring.
- Click “OK” if you are asked to uninstall an existing version of MNova.
- If you encounter problems, please see the detailed instructions provided by Mestrelab here: https://resources.mestrelab.com/how-to-install-mnova/.
- In the final installation window, click “Finish”.
- DO NOT RUN MNova yet.
4 – Configure connection to the UChicago license server (PC/Windows)
- Navigate to the following Box folder and log in: https://uchicago.box.com/v/MestrelabLicenses.
- Download the file named “Configure SharedRepository for Windows.reg“
- Double-click the .reg file to run it
- Stop here if your computer is bound to an “Active Directory” (AD)
- If your computer is “non-AD” or you do not know, then mount the share and save your credentials:
- Right-click on Start, then select “Run“
- For the address, type or copy/paste: \\licman.psd.uchicago.edu\Mestrelab
- Click OK
- You should get a prompt asking for credentials. Use:
userna me = LICMAN\mestrelab
pas sword = chemNMRlab340F - DEFINITELY check the “remember credentials” box, or else your computer won’t automatically connect
- You should now be connected to the license server. Check your Network area to see whether it includes “licman.psd…”
You should now be able to run MNova without further action. However it is highly recommended to take this opportunity to activate the advanced modules qNMR and Reaction monitoring now.
•
5. Install the advanced plugins qNMR (quantitative NMR) and Reaction Monitoring
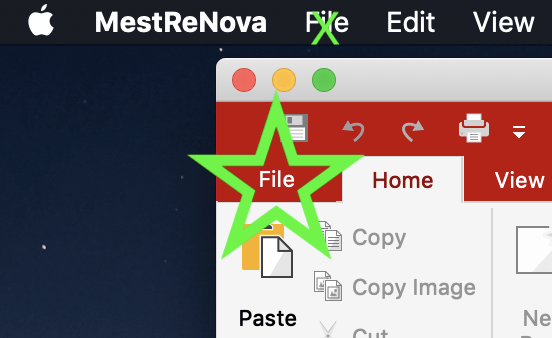
- With MNova open, navigate to the File menu in the MNova window (NOT the one at the top of the screen, at least for Mac users)
- In the tall menu that appears on the left of the MNova window, click on “Advanced Plugs” toward the bottom
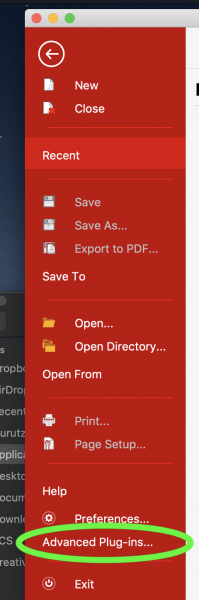
- A window should open that shows all the advanced plugins you may wish to install. They may require separate licenses, but you should be able to try them out on a trial basis.

- Locate the pluging “qNMR” and “Reaction Monitoring”, then check the boxes next to them. Then click “Install”.

- You will need to close and reopen MNova

- After restart, locate the qNMR and Reaction Monitoring plugins.


ENJOY MNova!!
Installation problems?
Check Mestrelab’s FAQ for help: https://mestrelab.com/faq/
Licensing problem?
Consider downloading the current zipped license file and installing it locally. If you do this, you will need to re-load new licenses the next time we upgrade the software.
To download and install licenses manually:
- Navigating to the Box page referred to above,
- Downloading the file named “licenses-2025.zip”, and place it in a convenient location. A folder named “mNovaLicenses” in your Documents folder will work nicely.
- Start MNova. You should see a window appear asking to locate and install the licenses. The the appropriate button and navigate to the file you just downloaded.
- Select that file and click “Install”.
Help getting started?
See Mestrelab’s array of tutorial: https://mestrelab.com/help-by-plugin/
- “Starting Guide (Mnova 12)” slides: https://www.mestrelab.com/pdf/Mnova-12-starting-guide-Mnova-Suite.pdf
- “1D NMR Processing” video: https://resources.mestrelab.com/mnova-1d-nmr-processing-a-quick-introduction/
- “2D NMR Processing” video: https://resources.mestrelab.com/mnova-2d-nmr-processing-a-quick-introduction/
Thanks!
This upgrade to MNova version 16 was funded with support from the Trivedi Foundation, which sought to support the Origins of Life work of Prof. Jack Szostak. All campus users are thus the beneficiaries of the Foundation’s generosity.
The original MNova software license was purchased in 2020 with institutional funds from:
- The University of Chicago College Innovation Fund (effort spearheaded by Chemistry Prof. Scott Snyder)
- The University of Chicago Chemistry Department (chair Andrei Tokmakoff)
Special recognition goes to Chemistry Graduate Student Ombudsperson Tessa Lynch-Colameta, who led the student initiative to make MNova available to everyone in the UChicago community.
Special thanks also go to the Faculty Instrumentation Committee overseeing the Chemistry Department core facilities: Prof. Guangbin Dong (chair), Prof. Wenbin Lin, and Prof. John Anderson.